Game From Zero: Part 1. 'Drawing'
Progress of developing a 2D game from scratch.

I haven’t done a series of posts about anything, only small snippets of things I’ve played with and topics that I am interested in. Originally I thought about doing a video recording about this, but I feel writing the progress is a much better way of sharing.
I don’t plan to make a tutorial on how to “correctly” build a game or a game engine. My plan is to keep track of the development of a small game and inspect in detail interesting topics that I enjoy focusing on.
The game is a 2D platformer with very simple “physics”. I still haven’t decided if I want to create it with pixel art or high resolution sprites. My original prototype was done with pixel art so I’ll probably stick to that for now.
Tools
I will mostly use C for this project. I might mix it with Python as a scripting language for building and with other target specific languages (Shaders, ObjC, JavaScript, C++, etc…).
I am currently developing this game on a MacBook Pro and the design is specific for mobile phones. For fun I still want to add other platforms like the Apple TV, MacOS, Windows and browsers.
Other external tools I am using are small libraries. Currently the project is only using stb_image.h for loading and parsing image files to raw pixels.
core/gfx.h
The first thing I wanted to do was getting something on the screen. Of course a “Hello, World!” isn’t enough. I wanted to draw sprites. So first I decided to design a very simple interface for my drawing API. Since I’ll only be rendering sprites, I won’t need to overcomplicate that specification. Things I need from this drawing interface:
- Clear background.
- Draw texture.
- Draw a tinted texture.
- Draw a portion of a texture (frame).
- Apply simple 2D transformations to the rendered objects.
I want the interface for this to be platform agnostic and easy to use. I’ve been using immediate drawing APIs for a while and I really enjoy the design. The last one I used was Dear ImGui, a library for rendering GUI which I highly recommend. I love how easy it is to prototype and have something running with very little code.
For making this design fast I’ll need to implement batching of sprites. Ideally this should also be mixed with texture atlases instead of individual textures.
This is how the current graphics and drawing API looks.
// core/gfx.h

void      gfx_initialize(void);
void      gfx_shutdown(void);
void      gfx_begin(void);
void      gfx_end(void);
void      gfx_flush(void);
void      gfx_set_clear_color(float r, float g, float b, float a);
void      gfx_push_matrix(void);
void      gfx_pop_matrix(void);
void      gfx_translate(float x, float y);
void      gfx_scale(float x, float y);
void      gfx_rotate(float r);
void      gfx_load_identity(void);
void      gfx_draw_texture_with_color(
            TextureID texture,
            float x, float y,
            uint32_t color
          );
void      gfx_draw_texture_frame_with_color(
            TextureID texture,
            float x, float y,
            float fx, float fy,
            float fw, float fh,
            uint32_t color
          );
void      gfx_draw_texture(TextureID texture, float x, float y);
void      gfx_draw_texture_frame(
            TextureID texture,
            float x, float y,
            float fx, float fy,
            float fw, float fh
          );
A quick overview of the functions.
This function initializes the platform’s graphics API. Allocates and binds the required resources like the rendering pipeline state, blend states, buffers, etc.
void gfx_initialize(void);This will destroy any instance of the graphics API and do a cleanup of acquired resources.
void gfx_shutdown(void);These functions handle setting up of the rendering state, emitting draw calls and doing the presentation of the current frame.
void      gfx_begin(void);
void      gfx_end(void);
void      gfx_flush(void);
This indicates which color will be used for clearing the screen.
void gfx_set_clear_color(float r, float g, float b, float a);These functions are for 2D transformations. Transformations are applied to each vertex during gfx_draw_xxx() function calls.
void      gfx_push_matrix(void);
void      gfx_pop_matrix(void);
void      gfx_translate(float x, float y);
void      gfx_scale(float x, float y);
void      gfx_rotate(float r);
void      gfx_load_identity(void);
Finally, we have three flavors for drawing an image on the screen.
void      gfx_draw_texture_with_color(
            TextureID texture,
            float x, float y,
            uint32_t color
          );
void      gfx_draw_texture_frame_with_color(
            TextureID texture,
            float x, float y,
            float fx, float fy,
            float fw, float fh,
            uint32_t color
          );
void      gfx_draw_texture(TextureID texture, float x, float y);
void      gfx_draw_texture_frame(
            TextureID texture,
            float x, float y,
            float fx, float fy,
            float fw, float fh
          );
TextureID is just an opaque pointer. I’ve decided to use an opaque pointer so it’s easier to port the implementation.
gfx_draw_texture_with_color just renders an image at an X and Y coordinate with a color. Color is multiplied to the texture’s base color. This makes white the default color.
gfx_draw_texture_frame_with_color renders a portion of and image. That portion is a rectangular section which has an x, y, width and height. All of this values must be inside the bounds that represent the whole texture size.
gfx_draw_texture is the same as gfx_draw_texture_with_color but with a default color.
gfx_draw_texture_frame is the same as gfx_draw_texture_frame_with_color but with a default color.
Metal Backend
Since Apple is killing OpenGL in all their devices, I’ve decided to use their own graphics API called Metal. The good thing about this is that Apple provides a nice list of resources to get started with it.
The Metal backend has been very simple to implement. If you’ve worked with any other API apart from OpenGL, Metal will seem very familiar. Before using Metal I had worked with OpenGL, WebGL, D3D11 and GX (Nintendo 3DS), and the last two have a lot of similarities with Apple’s graphics API. It’s important to point out that Metal seems to be a lot more explicit than D3D11.
Since I am targeting Apple devices, I need to either use Objective-C or Swift. Objective-C seems to work better with C so I chose that. I’ve only programmed in this language once and it was a very long time ago. The good thing is that Objective-C is a superset of C. This means I can use C and interoperate with it. Of course there are some weird things with this interoprability which I’ll mention later.
One thing that really helped me a lot on getting this thing up and running was MetalKit. MetalKit is a framework that helps with the creation of Metal applications. It helps by setting up a lot of stuff for you. It’s kind of SDL or GLFW but for Metal. The only things I’ll be using from MetalKit are MTKView and MTKViewDelegate.
To start using MetalKit I only need to link the library MetalKit.framework and change the class of my View on the ViewController to MTKView. After that I create a View delegate that extends MTKViewDelegate. Having done that I should be ready to initialize Metal and start doing some programming on the implementation of my drawing interface.
The code for initializing Metal is very simple. It’s only a couple of lines:
MTKView* metalKitView = nil;
MetalViewDelegate* metalViewDelegate = nil;

metalKitView = (MTKView*)self.view;
metalKitView.device = MTLCreateSystemDefaultDevice();
if (!metalKitView.device) {
  NSLog(@"Failed to create default metal device");
  exit(1);
  return;
}
metalViewDelegate = [[MetalViewDelegate alloc] initWithMetalKitView:metalKitView];
metalKitView.delegate = metalViewDelegate;
This will create an instance for a Metal device and bind the view delegate with the view. All this is done on the method viewDidLoad from UIViewController on iOS/TvOS and NSViewController for MacOS.
Sprite Shader
The Metal Shading Language is very similar to HLSL but with a C++ flavor. Luckily a “Sprite” shader is very simple. Here you can see the code:
#include <metal_math>
#include <metal_stdlib>
using namespace metal;

struct VertexUniform {
    float2 resolution;
};

struct TextureVertexIn {
    float2 position[[attribute(0)]];
    float2 texCoord[[attribute(1)]];
    uchar4 color[[attribute(2)]];
};

struct TextureVertexOut {
    float4 position[[position]];
    float2 texCoord;
    float4 color;
};

vertex TextureVertexOut textureColorVS (
                               uint vertexID[[vertex_id]],
                               device TextureVertexIn* vertices[[buffer(0)]],
                               constant VertexUniform& uniform[[buffer(1)]]) {

    TextureVertexOut out;
    TextureVertexIn vert = vertices[vertexID];
    out.position = float4(((vert.position / uniform.resolution) * 2.0 - 1.0) * float2(1.0, -1.0), 0.0, 1.0);
    out.texCoord = vert.texCoord;
    out.color = float4(vert.color.abgr) / float4(255.0);

    return out;
}

fragment float4 textureColorFS (
                                TextureVertexOut in[[stage_in]],
                                texture2d<float> colorTexture[[texture(0)]]) {

    constexpr sampler nearestSampler(mag_filter::nearest, min_filter::nearest);
    const float4 color = colorTexture.sample(nearestSampler, in.texCoord) * in.color;

    return color;
}
Let’s split this code into sections.
This is the representation for the constant/uniform data. We could add more values here but for now resolution should be enough. Here resolution is just the width and height of the current view.
struct VertexUniform {
    float2 resolution;
};
TextureVertexIn and TextureVertexOut are the layout definitions for the vertex and the fragment program input data. If you’ve worked with GLSL this would be the equivalent of attribute and varying.
struct TextureVertexIn {
    float2 position[[attribute(0)]];
    float2 texCoord[[attribute(1)]];
    uchar4 color[[attribute(2)]];
};

struct TextureVertexOut {
    float4 position[[position]];
    float2 texCoord;
    float4 color;
};
This is the vertex function.
vertex TextureVertexOut textureColorVS (
                               uint vertexID[[vertex_id]],
                               device TextureVertexIn* vertices[[buffer(0)]],
                               constant VertexUniform& uniform[[buffer(1)]]) {

    TextureVertexOut out;
    TextureVertexIn vert = vertices[vertexID];
    out.position = float4(((vert.position / uniform.resolution) * 2.0 - 1.0) * float2(1.0, -1.0), 0.0, 1.0);
    out.texCoord = vert.texCoord;
    out.color = float4(vert.color.abgr) / float4(255.0);

    return out;
}
This is the only line that really matters in this function.
out.position = float4(((position / resolution) * 2.0 - 1.0) * float2(1.0, -1.0), 0.0, 1.0);Here we transform from world space to clip space. First we normalize the vertex position, after that we center it in the screen and finally we invert the vertical coordinate. We do this because in our coordinate system of our renderer we use pixels as coordinate units and the origin is at the top left corner. I do this because I am used to it.
The fragment function is also very simple. First we define a sampler with neareast filtering and then we take a sample at the current interpolated texture coordinate and multiply that value by the vertex color.
constexpr sampler nearestSampler(mag_filter::nearest, min_filter::nearest);
const float4 color = colorTexture.sample(nearestSampler, in.texCoord) * in.color;
Push Quad
Sprites in this game are represented by two triangles forming a quad. I know I could’ve used indexed buffers but I didn’t. No specific reason why.
Each vertex is multiplied by the current transform matrix before being added to the array of vertices.
The function that handles this is very simple:
static __attribute__((always_inline)) inline TextureColorVertex _transform_vertex (float32_t x, float32_t y, float32_t u ,float32_t v, uint32_t color) {
    vec2_t output = { 0.0f, 0.0f };
    vec2_t input = { x, y };
    mat2DVec2Mul(&output, &gGfxState.matrixStack.matrix, &input);
    TextureColorVertex vertex = { { output.x, output.y }, { u, v }, color };
    return vertex;
}

static __attribute__((always_inline)) inline void _push_quad(float32_t x, float32_t y, float32_t w, float32_t h, float32_t u0, float32_t v0, float32_t u1, float32_t v1, uint32_t color) {
    if (gGfxState.vertices.count >= kMaxVertices) return;
    TextureColorVertex vert0 = _transform_vertex(x, y, u0, v0, color);
    TextureColorVertex vert1 = _transform_vertex(x, y + h, u0, v1, color);
    TextureColorVertex vert2 = _transform_vertex(x + w, y + h, u1, v1, color);
    TextureColorVertex vert3 = _transform_vertex(x + w, y, u1, v0, color);
    TextureColorVertex* pVertices = &gGfxState.vertices.pBuffer[gGfxState.vertices.count];
    pVertices[0] = vert0;
    pVertices[1] = vert1;
    pVertices[2] = vert2;
    pVertices[3] = vert0;
    pVertices[4] = vert2;
    pVertices[5] = vert3;
    gGfxState.vertices.count += 6;
    gGfxState.pCurrentBatch->vertexCount += 6;
}
These functions are not exposed via an interface and are only used in the implementation.
The first function _transform_vertex multiplies the vertex position by the current transform matrix.
The second function _push_quad generates all the vertices for the current quad and adds them to the array of vertices.
These functions are used internally by the gfx_draw_xxx() functions to generate vertices.
This is how the implementation for drawing a texture frame looks like:
void gfx_draw_texture_frame_with_color(TextureID texture, float32_t x, float32_t y, float32_t fx, float32_t fy, float32_t fw, float32_t fh, uint32_t color) {
    DBG_ASSERT(gGfxState.pipelineID == PIPELINE_TEXTURE, "Need to set pipeline to PIPELINE_TEXTURE to draw textures.");
    id<MTLTexture> mtlTexture = _check_tex_batch(texture);
    float32_t width = (float32_t)mtlTexture.width;
    float32_t height = (float32_t)mtlTexture.height;
    float32_t u0 = fx / width;
    float32_t v0 = fy / height;
    float32_t u1 = (fx + fw) / width;
    float32_t v1 = (fy + fh) / height;
    _push_quad(x, y, fw, fh, u0, v0, u1, v1, color);
}
I can probably optimize this function by caching the UV coordinates or something, but for now this works for me.
BatchBatchBatch
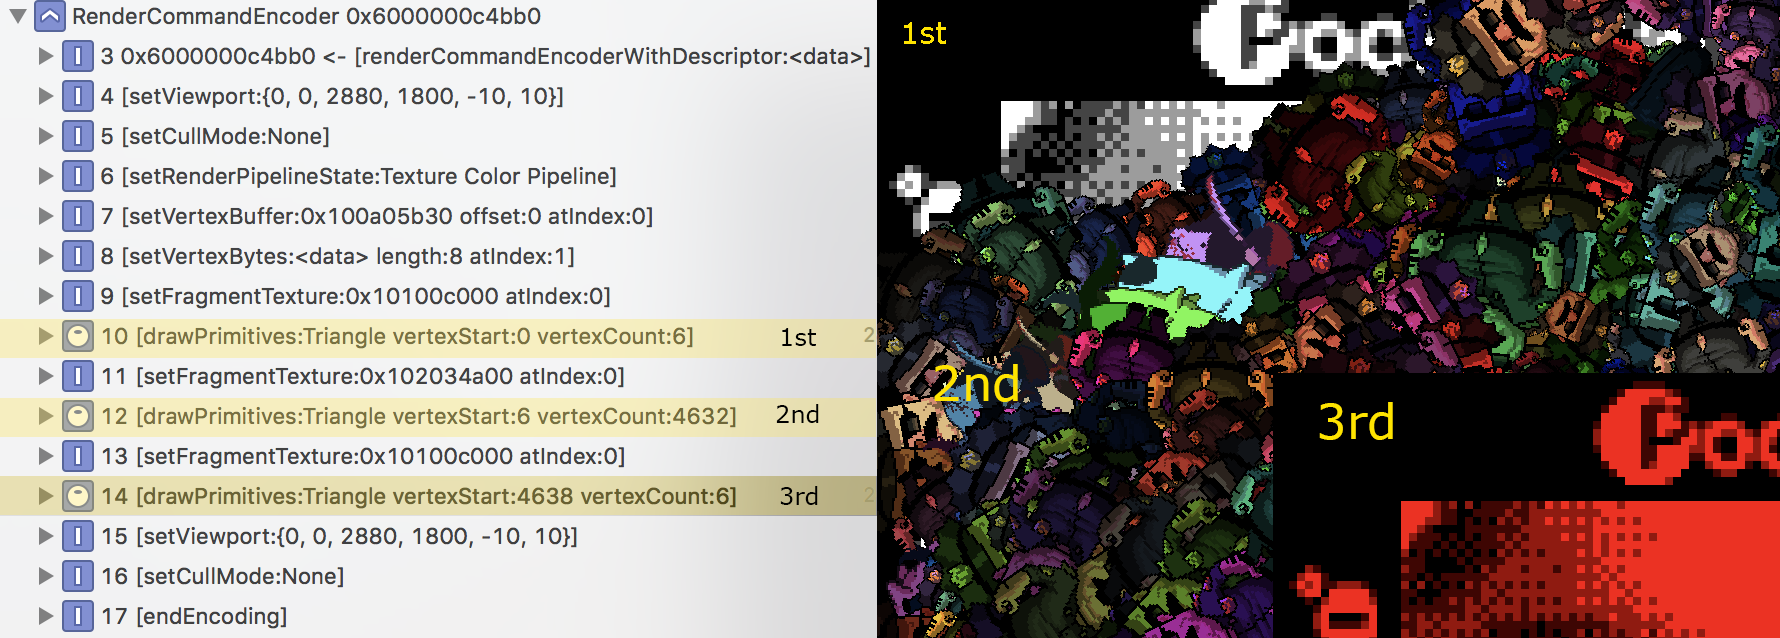
Dynamic batching is still very relevant when dealing with sprite rendering even with modern APIs like Metal. The way I am internally handling this is checking if there is any texture change. If there is one I create a new batch entry indicating the texture id, starting vertex index and the vertex count for that batch.
This is how the batching structure looks like.
typedef struct {
    TextureID texture;
    uint32_t vertexCount;
    uint32_t offset;
} DrawBatch;

typedef struct {
    DrawBatch* pBuffer;
    uint32_t count;
} DrawBatchBuffer;
During the gfx_flush() function I process the batch collection and emit draw calls. This how it looks:
size_t size = gGfxState.vertices.count * sizeof(TextureColorVertex);
memcpy(gGfxState.vertexBuffer[gGfxState.frameIdx].contents, (void*)gGfxState.vertices.pBuffer, size);
[renderEncoder setRenderPipelineState:gGfxState.pipelines[PIPELINE_TEXTURE]];
[renderEncoder setVertexBuffer:gGfxState.vertexBuffer[gGfxState.frameIdx] offset:0 atIndex:0];
[renderEncoder setVertexBytes:&gGfxState.uniformData length:sizeof(BaseShaderUniform) atIndex:1];
for (uint32_t index = 0; index < count; ++index) {
    DrawBatch* pBatch = &pBatches[index];
    id<MTLTexture> mtlTexture = ((__bridge id<MTLTexture>)pBatch->texture);
    [renderEncoder setFragmentTexture:mtlTexture atIndex:0];
    [renderEncoder drawPrimitives:MTLPrimitiveTypeTriangle vertexStart:pBatch->offset vertexCount:pBatch->vertexCount];
}
What this section of code does is copy the contents from the vertex array to the vertex buffer, set the render pipeline state, update the constant buffer and finally iterate through all the batches while binding the batch’s texture and adds draw calls to the current command buffer.
Triple Buffering
Triple buffering is part of Metal’s Best Practices, but it’s more than just a good practice, it’s necessary if you want to have something running decently. It also applies to other APIs so it’s not limited to Metal. This means you need to add sync points by hand. APIs like OpenGL generally handle this internally.
Sync points are important tools because they help us prevent writing over data that is being used by the GPU. So instead of stalling until the GPU has finished processing the current frame, we allocate three buffers and then once the current command buffer is commited we swap to the next buffer. That way we don’t have to wait for that frame’s work to be done and we can process the next buffer. If you’ve done AZDO in OpenGL you’ve probably done triple buffering too.
The recommended way for adding sync points on Metal is by using the semaphore primitive dispatch_semaphore_t. On the function gfx_begin() I call dispatch_semaphore_wait(gGfxState.frameSemaphore, DISPATCH_TIME_FOREVER) if the semaphore hasn’t been signaled it’ll stall and wait for it. In the end of my frame on gfx_end() I call:
__weak dispatch_semaphore_t semaphore = gGfxState.frameSemaphore;
[gGfxState.cmdBuffer addCompletedHandler:^(id<MTLCommandBuffer> commandBuffer) {
    dispatch_semaphore_signal(semaphore);
}];
This will register a callback for when that current command buffer has finished executing and in the callback I will emit a signal for the semaphore to be unlocked and stop any stall during gfx_begin().
The stupid pointer bug
Finally, I wanted to end this post with a very stupid bug that took me hours to fix. I’ve never used C with Objective-C so I had no idea how they interoperability worked. I just went with it and used Objective-C like I would use C. One important thing I didn’t know was that by default Objective-C is a memory managed language. This can be disabled but by default it uses an approach called Automatic Reference Counting or ARC. C doesn’t. This means that any interaction between a C API and Objective-C needs to have that in mind. The problem I encountered while developing the Metal backend was that I was casting an id<MTLTexture> to a void*. I do this so I can pass around the texture pointer on my game code, which is all written in C. The problem with this is that Objective-C needs to know what happens when you cast that object. Since I wasn’t properly communicating that information to the objc runtime as soon as I tried to access that texture, I would get a EXC_BAD_INSTRUCTION (code=EXC_I386_INVOP, subcode=0x0) error with a log on the console saying [MTLDebugTexture retain]: message sent to deallocated instance 0x6000001a25a0. This meant of course that my texture was being released and I was trying to access that stale texture pointer. The solution for this problem was basically RTFM. I hadn’t read how bridge casts worked and as soon as I did the “You IDIOT!” message started echoing in my head. Here you can read how bridge casts work. What I was doing originally was this:
id<MTLTexture> mtlTexture = /* create texture ... */ ;
void* pOpaque = ((__bridge void*)mtlTexture);
return pOpaque;
and then I tried to read it by casting it back to an id<MTLTexture>.
vec2_t gfx_texture_size(void* pTexture) {
  id<MTLTexture> mtlTexture = ((__bridge id<MTLTexture>)pTexture);
  vec2_t size = { mtlTexture.width, mtlTexture.height };
  return size;
}
As soon as I casted it from void* I got a EXC_BAD_INSTRUCTION. The solution was easy. When creating the texture instead of using __bridge modifier I should’ve used __bridge_retained. What this keyword does is increment the reference counter for that specific object. Which means that if I pass the pointer to my C game code I can use it without problem and if I pass it back to Objective-C I can just use __bridge and it won’t modify the ref counter. The only moment I need to decrement the ref count is when I want to release it and for that I just do a cast to id<MTLTexture> by using the keyword __bridge_transfer. After doing this change I stopped getting the bad instruction error and the renderer worked perfectly.
The result
The result at the end was what I wanted. A simple 2D renderer that can draw frames and tint them. Here is how it looks on an iPhone 7.
More stuff added to my tiny renderer. Support for sprite sheets and tinting pic.twitter.com/XMN1vsrQn3
— felipe (@bitnenfer) September 20, 2018
The cool thing is that since it was developed with Metal, I can also run it on my Apple TV. It honestly has a better performance than what I expected.
It works nice on my apple tv :D pic.twitter.com/7kEVxAerfF
— felipe (@bitnenfer) September 20, 2018